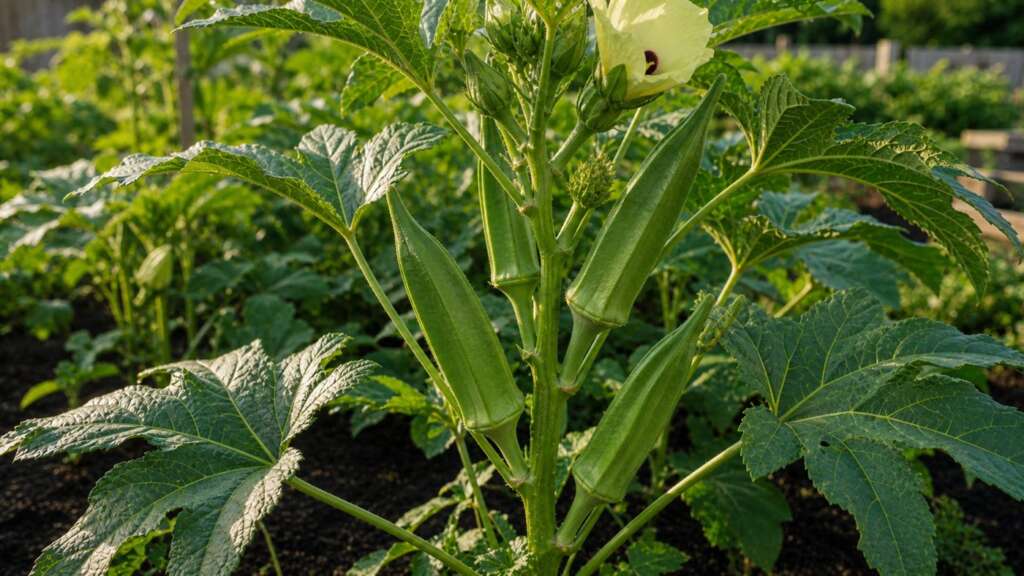
Star of David Okra is a tall, heat-loving Israeli heirloom grown for its plump, deeply ridged pods. Slice one of the fat pods crosswise and the ribs form a clean star pattern, which is where the variety gets its name. Like all okra, it is a warm-season annual that resents cold soil and rewards patience: wait for genuine summer warmth, sow shallowly into a well-prepared bed, and the plants will pay you back with steady picking through the hottest weeks of the year.
Quick How-to
Sow Star of David Okra outdoors only after the last frost has passed and the soil has truly warmed, generally once daytime temperatures sit in the upper 70s F and nights stay above the mid 50s F. Plant seed about 1/2 to 1 inch deep, water in gently, and keep the bed evenly moist until emergence. Expect sprouts in about 5 to 14 days when soil is in the 75 to 90 F range. Thin to one strong plant every 12 to 18 inches, give full sun and steady water, and begin picking pods young, while they are still tender, for the most productive season.
Quick Guide
| Fact | Recommendation |
|---|---|
| Best method | Direct sow into warm soil; indoor start only where summers are short |
| Sowing depth | About 1/2 to 1 inch |
| Germination temperature | About 75 to 90 F is ideal; below 65 F is risky |
| Days to germination | About 5 to 14 days in warm soil |
| Seed prep | Optional overnight soak in room-temperature water can speed emergence |
| Spacing | About 12 to 18 inches between plants, 3 feet between rows |
| Sun | Full sun, ideally 8 or more hours |
| Water | Even moisture once flowering begins; avoid waterlogged soil |
| Harvest | About 60 to 75 days from sowing; pick pods every day or two while tender |
| Plant size | Vigorous; commonly 5 to 7 feet tall in a warm summer |
Before You Sow
Okra is one of the few summer vegetables that genuinely thrives in heat that wilts other crops. The trade-off is that it stalls in cool soil and germinates poorly when temperatures swing. Choose your warmest, sunniest bed. South-facing spots near a path or wall that radiates heat are ideal. Skip locations that stay damp into late spring.
Prepare the bed by loosening the top several inches, working in finished compost if the soil is heavy or low in organic matter, and raking the surface smooth. Okra appreciates soil that drains well but holds enough moisture to keep flowering steady through summer. A near-neutral pH suits it; very acidic soil can slow vigor.
Star of David seed is the hard, round, pale type common to okra. The seed coat is firm enough that many gardeners get faster, more even germination after a simple overnight soak in room-temperature water. Drain the seed before sowing and plant the same day so it does not dry back down or sit in standing water.
Direct Sowing
Direct sowing is the most reliable method for okra in most of the United States. The plant has a sturdy taproot and dislikes root disturbance, so seed sown in place usually outpaces equivalent indoor-started transplants once the weather warms.
Wait until soil at sowing depth reads about 70 F or warmer for several consecutive days. A simple soil thermometer takes the guesswork out of this; air temperature alone can mislead you when nights are still cool. Make a shallow furrow or poke individual holes about 1/2 to 1 inch deep, drop in seed, cover with fine soil, and firm gently. Space seed every 4 to 6 inches and plan to thin to the final 12 to 18 inches once seedlings have a few true leaves.
Water in with a gentle shower so seed is not washed sideways. Keep the surface evenly moist until emergence; in hot, windy weather a thin straw mulch over the row can help prevent crusting without burying the seedlings. Once true leaves appear, pull back any mulch directly over the seed line so young stems are not shaded.
Indoor Starting
Indoor starting is optional and is most useful where summers are short or where late spring weather is unreliable. Sow about 3 to 4 weeks before the planned transplant date, not earlier. Okra grows fast indoors once it gets going, and oversized seedlings transplant poorly.
Use deep cells or 3-inch pots rather than shallow trays. The taproot wants room to head down. Sow 1/2 inch deep in pre-moistened seed-starting mix, keep the medium warm (a heat mat held around 80 to 85 F works well), and provide strong overhead light immediately after sprouts emerge. Weak light is the most common reason indoor okra seedlings get tall and floppy.
Water from below when possible and avoid letting the mix dry out completely between drinks. Do not let plants flower in the cell; if buds appear indoors, the seedlings are already past their best transplant size.
Transplanting and Thinning
Harden off indoor seedlings over 7 to 10 days. Start in dappled shade, sheltered from wind, and work up to full sun and outdoor nights. Move plants outside only after frost is gone and soil is warm at planting depth.
Set transplants at the same depth they were growing in the pot. Water in well. If you direct sowed, thin in two passes: first to about 6 inches once true leaves are visible, then to the final spacing of 12 to 18 inches between plants once the keepers are clearly the strongest. Snipping unwanted seedlings at the soil line with scissors is gentler on the keepers than pulling, which can disturb shared roots.
For Star of David specifically, plants tend to grow tall and wide, so resist the temptation to crowd them. Better airflow means fewer disease problems and easier picking when pods are coming on heavily.
Soil, Sun, and Water
Full sun is non-negotiable for productive okra. Anything less than about six hours of direct sun typically slows flowering and reduces pod set. Soil should be fertile and well drained, with enough organic matter to hold moisture during the hot weeks when okra hits its stride.
Water deeply rather than frequently once plants are established. The goal is a steady moisture supply through the root zone, not constant surface wetness. Drip lines or soaker hoses work well. Mulch with straw or shredded leaves after the soil has fully warmed; this conserves moisture and keeps soil temperature even.
Fertilize lightly. A modest side dressing of balanced fertilizer or composted manure when plants begin to flower can keep production steady, but heavy nitrogen pushes leafy growth and stalls pod set. If plants look lush and green but flowers are sparse, ease back on nitrogen and check for shading or root competition.
Top Mistakes
- Sowing into cold soil. This is the single biggest cause of disappointing okra stands. Seed sown into ground below about 65 F often rots, emerges thinly, or comes up so slowly that weeds get ahead. Wait an extra week if you are unsure.
- Skipping the soak in heavy soils. The hard seed coat is fine in loose warm beds. In clay or cooler conditions, an overnight soak can shave days off germination and improve evenness.
- Letting pods grow oversized. Star of David holds tenderness at a larger size than slimmer okra varieties, but pods left too long still turn woody and fibrous. Once a pod hardens on the plant, it also signals the plant to slow new flowering.
- Crowding. Star of David plants want elbow room. Tight spacing produces tall, leggy plants with reduced pod set and poor airflow at the base.
- Heavy nitrogen feeding mid-season. Too much nitrogen produces a leafy plant that hides its own flowers and slows fruiting.
Troubleshooting by Symptom
| Symptom | Likely causes | What to do next |
|---|---|---|
| Seed never sprouts | Soil too cold, surface crusted, seed buried too deep, or bed went dry mid-germination | Confirm soil is at least 65 to 70 F before resowing, plant no deeper than 1 inch, water gently to avoid washing seed, and consider an overnight soak before sowing |
| Patchy stand | Uneven soil contact, dry pockets along the row, or seed washed away by heavy watering | Smooth the seedbed, water in with a fine shower, and fill gaps by resowing into the same row once the keepers are visible |
| Seedlings stall after emerging | Cool nights, cold spring rains, or compacted soil | Wait for stable warmth, side-dress lightly once plants resume growth, and avoid working the soil while it is wet |
| Plants are tall and leafy but flowers are scarce | Too much nitrogen, too little sun, or crowded spacing | Stop high-nitrogen feeding, prune any shading neighbors, and confirm plants have full sun |
| Flower buds drop before opening | Heat extremes, drought stress, or sudden swings between wet and dry soil | Mulch the root zone, water more deeply and consistently, and accept a brief pause during heat waves; production usually resumes |
| Pods are tough and fibrous when picked | Pods left on the plant too long | Pick more often, every one to two days during peak season, and harvest pods at the size your taste prefers |
| Plants stop producing mid-summer | Mature pods left on the vine signaling the plant to slow flowering | Strip all oversized pods off the plant, water well, and pick young pods daily; production often rebounds |
| Sticky residue on stems or leaves | Aphids in cooler weather, often resolving as heat builds | Spray off with water, encourage beneficial insects, and avoid heavy feeding that prolongs soft growth |
| Skin itch when harvesting | Fine spines on okra leaves and pods are mildly irritating to many people | Wear long sleeves and light gloves when harvesting |
Harvest and Kitchen Use
Star of David produces fat, round, deeply ridged pods rather than the slim tapered pods of most common okra. The variety is prized for holding tenderness at a larger size, but it still has a limit. Most cooks find the best texture at about 3 to 5 inches long, when pods snap cleanly off the stem and the cut end shows pale, juicy flesh.
Harvest with a knife or pruners; twisting can damage the stem. Plan on picking every one to two days in peak season. Pods you miss today will be noticeably larger tomorrow, and pods left to mature signal the plant to slow flowering.
In the kitchen, the thick walls and dense flesh hold up well to grilling, roasting, and stewing. The cross-section makes Star of David particularly attractive when sliced into soups, gumbos, or pickle jars.
Seed Saving
Okra is largely self-pollinating but will accept some insect-mediated crossing between varieties grown nearby. For seed that comes reasonably true to type, separate Star of David from other okra varieties by at least several hundred feet, or grow only one variety in a season.
Leave a few well-formed pods on the strongest plants to dry fully on the stem. They will turn brown, harden, and eventually split. Pick before they shatter on the ground, finish drying indoors, then crack open the pods and collect the round, hard seed. Label with variety and year and store cool, dry, and sealed.
Storing Leftover Seed
Keep unused Star of David Okra seed in its labeled packet inside a sealed container in a cool, dry, dark indoor location. Avoid garages, sheds, greenhouses, and sunny windowsills, where temperature and humidity swing sharply. Label home-saved seed with the variety and harvest year before storing it.
FAQ
Should I soak Star of David Okra seeds before planting?
An overnight soak in room-temperature water is optional but commonly helpful, especially when the soil is on the cooler side of okra’s preferred range. Drain and sow the same day.
Can I grow Star of David Okra in containers?
Yes, in large containers of at least 5 gallons per plant, with full sun and steady water. Smaller pots dry out too quickly to support the plant’s mid-summer pod production.
Why are my okra pods tough?
Tough pods almost always mean the harvest waited too long. Star of David tolerates a larger picking size than thinner varieties, but daily picking during peak heat gives the best texture.
How tall does Star of David Okra get?
This is a tall, vigorous heirloom that commonly reaches about 5 to 7 feet in a hot summer. Plants may finish shorter where summers are cool or roots are restricted, and taller where the season is long and soil is fertile.
Can I direct sow, or do I need transplants?
Direct sowing is preferred wherever the season is long enough. Use transplants only where summers are short or late springs are unreliable, and keep the indoor period brief.