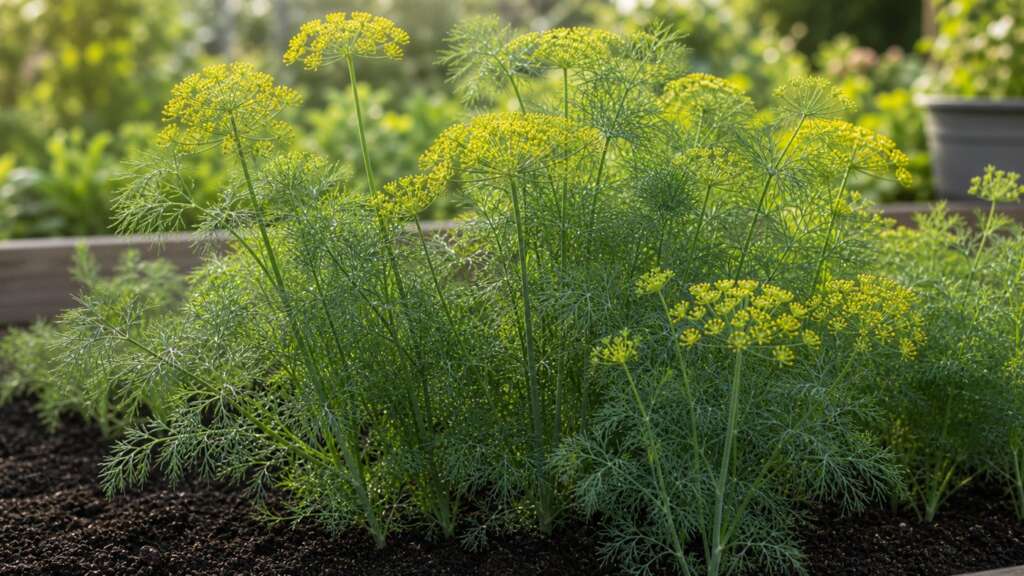
Bouquet Dill is a productive garden dill grown for tender, feathery leaves and the large umbels of yellow flowers used for pickling and seed. It is a cool-to-mild-season annual herb that grows a taproot, which is why it strongly prefers to be direct sown where it will live rather than moved from a tray. With shallow sowing, steady moisture, and full sun, it is one of the easier herbs to start from seed.
Quick How-to
Direct sow Bouquet Dill outdoors in spring once the soil can be worked and frost danger is fading, or in early fall in mild-winter areas. Cover the seed about 1/4 inch deep, press for soil contact, and keep the surface evenly moist. Expect germination in about 10 to 14 days when soil is around 60 to 70 F. Thin seedlings while they are small so each plant has airflow and room to send down its taproot. For a steady leaf supply, sow a small new patch every two to three weeks until summer heat arrives.
Quick Guide
| Fact | Recommendation |
|---|---|
| Best method | Direct sow where plants will grow; transplanting is not preferred |
| Sowing depth | About 1/4 inch, lightly covered |
| Germination temperature | Best around 60 to 70 F |
| Days to germination | About 10 to 14 days |
| Light for germination | Light contact with soil is enough; do not bury deeply |
| Spacing | Thin to about 6 to 12 inches apart |
| Sun | Full sun; light afternoon shade in hot climates is acceptable |
| Water | Even, consistent moisture for tender leafy growth |
| Harvest | Leaves anytime after plants have several true leaves; flower umbels for pickling; mature seed later |
| Plant size | Tall, upright annual herb; verify final packet height |
Before You Sow
Bouquet Dill rewards a small amount of bed preparation. Choose a sunny, sheltered spot with loose, well-drained soil. Heavy or compacted soil makes it harder for the taproot to push down, which can produce shorter plants that bolt earlier. Rake the surface smooth, break up clods, and water the bed lightly before sowing so tiny seed is not washed deep when you water it in afterward.
Dill does not need rich feeding to perform well. Average garden soil with a little compost worked in is usually plenty. Avoid pushing high-nitrogen fertilizer, which can produce soft, floppy stems that lean over once the umbels develop.
If you are sowing in a container, choose a deeper pot rather than a shallow herb planter. The taproot will appreciate the room. Pick a container with drainage and a light potting mix that holds moisture without staying soggy. Label the row or pot — dill seedlings look similar to several other young herbs in their first week or two.
Direct Sowing
Direct sowing is the natural method for dill because the plant resents being lifted once its taproot has started to anchor. Scatter or place seed thinly along a shallow row or block, cover with about 1/4 inch of fine soil, and press the surface gently for good seed-to-soil contact. Water in with a gentle spray so the seed is not floated out of place.
Keep the seedbed evenly moist until you see green needles emerging. If the top layer dries and crusts during germination, seedlings can fail to break through even when the seed has started to grow underneath. A light layer of fine soil or a shade cloth in hot weather can help hold moisture during the first week or two.
Once seedlings are a couple of inches tall and have true, feathery leaves, thin to roughly 6 to 12 inches apart. Crowded dill plants tend to lean, develop weaker stems, and bolt sooner. For a continuing leaf harvest, sow a small new patch every two to three weeks through spring and again in late summer for a fall round.
Indoor Starting
Indoor starting is possible but not preferred for dill. Because dill grows a taproot, transplant shock can stall plants or trigger early bolting. If you want a small head start in a short-season area, sow into deep cells or biodegradable pots that can go directly into the ground without disturbing roots. Keep the indoor stretch short — about three to four weeks at most — and transplant before seedlings become crowded.
Give indoor seedlings strong overhead light as soon as they emerge. Warm, dim conditions are the most common reason indoor herbs become tall and thin. Harden off over several days before planting out, and water in well.
Soil, Sun, and Water
Dill prefers full sun, fertile but not heavily fertilized soil, and steady moisture. Six or more hours of direct sun produces sturdier plants with more flavor. In very hot climates, a little afternoon relief can extend the leaf-harvest window before plants bolt.
Soil should drain well. Dill tolerates a range of soil types but performs best when the seedbed is loose enough for the taproot to descend freely. Work compost into the bed before sowing if your soil is lean.
Water management is mostly about consistency. Until germination, think evenly moist surface. After plants establish, water when the top inch begins to dry, and aim for steady moisture rather than alternating drought and saturation. Big swings can hasten bolting, toughen leaves, and reduce flavor.
Top Mistakes
- Burying seed too deep. Dill seed should be only lightly covered. Deep sowing delays emergence and produces weaker sprouts.
- Trying to transplant mature seedlings. Dill resents root disturbance. Either direct sow or transplant very young plants from deep cells, root ball intact.
- Letting the surface crust during germination. The top layer can dry while soil underneath stays damp. Keep the surface evenly moist until you see green needles.
- Leaving seedlings crowded. Thin early. Crowded dill leans, develops weak stems, and tends to bolt sooner.
- Overfertilizing. Excess nitrogen produces lush but floppy growth and can reduce flavor concentration in the leaves.
- One-time sowing. A single planting peaks and then bolts. Small successions every two to three weeks give a much longer leaf harvest.
Troubleshooting by Symptom
| Symptom | Likely causes | What to do next |
|---|---|---|
| No sprouts after 14 days | Seed buried too deep, soil too cold, surface crusted, or seedbed allowed to dry | Resow shallowly, keep the surface evenly moist, and wait for soil to reach roughly 60 to 70 F |
| Patchy or uneven germination | Inconsistent watering, seed washed into low spots, or cloddy soil | Smooth the bed before sowing, water in gently, and cover with a thin, even layer of fine soil |
| Seedlings are tall, pale, and floppy | Weak light indoors, too much warmth, or overcrowding | Move under stronger light, cool the growing area, and thin promptly |
| Seedlings collapse at the soil line | Overly wet mix, poor airflow, or damping-off conditions | Improve airflow, reduce watering frequency, and start over with fresh seed-starting mix indoors if needed |
| Plants bolt very quickly | Heat, drought stress, long days, or transplant shock | Sow earlier in the cool season, water evenly, use light shade in heat, and switch to succession sowings |
| Leaves taste flat or harsh | Heat stress, drought, late harvest, or excess nitrogen | Harvest younger leaves in cooler conditions, water more evenly, and ease back on feeding |
| Stems lean or fall over | Crowding, too much shade, wind exposure, or rich soil | Thin to recommended spacing, give full sun, and stake taller plants in exposed sites |
| Seed heads shatter before you collect them | Heads left on the plant too long after drying | Watch heads daily as they brown, and cut into a paper bag once seeds release easily |
Timing and Climate Notes
Dill is happiest in the shoulder seasons. Sow in early to mid spring as soon as the soil can be worked and frost danger is fading. In mild-winter climates, a fall sowing often produces excellent late-season leaves and overwintering flower stalks the following spring. In hot summer regions, the spring window is short — plants will bolt as days lengthen and temperatures climb, so plan for an earlier sowing and switch to small successions or a fall round for continued leaves.
Frost-free air is not the only signal. Cold, wet soil can keep seeds sitting in place or rotting. If spring is erratic, wait a few extra days for soil to warm and drain rather than planting into a soggy bed.
Container and Small-Space Notes
Bouquet Dill adapts to containers when the pot is deep enough for the taproot. Aim for a container at least eight to ten inches deep, with good drainage and a quality potting mix. Group several plants in a larger pot rather than one plant per small pot, and thin to airflow once seedlings are up.
Container plants depend on you for watering. Small pots dry quickly and heat up faster than the ground, both of which can push dill to bolt sooner. Check moisture daily in warm weather, and consider grouping pots together to reduce stress at the hottest part of the day.
Harvest, Bloom, and Kitchen Use
You can begin snipping leaves once plants have several true, feathery leaves and look established. Take outer growth first and leave the central crown to keep producing. For fresh kitchen use, leaves are best harvested in the cool of the morning and used quickly; they freeze better than they dry.
For pickling, harvest whole umbels as they reach full bloom and the yellow flowers are open. This is the classic “dill head” used in cucumber pickles. For seed, let the umbels finish blooming and allow the seed to develop and dry on the plant. Watch closely as the heads turn brown — mature dill seed shatters readily, so cut heads into a paper bag once you can dislodge seed with a gentle tap.
Dill is also useful in the garden ecosystem. Its flowers attract beneficial insects, and the plant is a host for swallowtail butterfly caterpillars. If you find striped caterpillars on your dill, consider leaving a few plants for them and harvesting from others.
Seed Saving
Dill is one of the easier herbs to save seed from at home. Let healthy, well-grown plants flower and set seed. Once umbels are mostly brown and dry, cut them into a paper bag and finish drying indoors in a single layer out of direct sun. Rub the dry heads gently to release seed, winnow out the chaff, and store seed in a labeled, sealed container.
If you grow more than one dill variety in the same garden, cross-pollination can occur because dill is insect-pollinated. For seed that runs true to type, separate varieties by distance or grow only one at a time when seed saving matters.
Seed Viability and Storage
Dill seed is generally considered viable for about three to four years when stored cool, dry, dark, and sealed. Some sources cite shorter useful life, so treat older seed with a quick germination test before relying on it for a main planting. Place ten to twenty seeds on a damp paper towel, fold, slip into a plastic bag, and check after about two weeks. A reasonable sprout rate means the seed is still worth sowing, perhaps a little more thickly than usual.
FAQ
Should I direct sow dill or start it indoors?
Direct sow whenever possible. Dill grows a taproot and does not enjoy being lifted from a tray. Indoor starting can work in short-season areas if you use deep cells or biodegradable pots and transplant the seedlings while they are still small.
How often should I sow dill?
For a steady leaf supply, sow a small patch every two to three weeks from spring through early summer, and again in late summer for a fall round. A single sowing peaks and then bolts.
Can I grow dill in a container?
Yes, but choose a deeper pot rather than a shallow herb planter so the taproot has room. Water more attentively than for in-ground plants, since containers dry out faster.
When do I harvest dill seed?
When the umbels have turned mostly brown and the seed comes loose with a gentle tap. Cut heads into a paper bag to catch any seed that releases on its own.
Why is my dill flowering so soon?
Bolting is the plant’s response to heat, long days, drought, or root stress. Sow earlier in the season, keep moisture even, and start small successions so you always have younger, leafier plants on hand.
Does dill come back every year?
Bouquet Dill is grown as an annual, but it often self-sows where conditions suit it. Leaving a few seed heads to drop in place can give you volunteer plants the following season.