Thai Basil is a warm-season annual culinary herb grown for narrow, glossy green leaves, purple-tinted stems, and a sweet anise-clove fragrance that holds up better in heat and cooked dishes than common sweet basil. It is the basil most often called for in Thai, Vietnamese, and Lao cooking, where stems are tossed whole into stir-fries, curries, and pho at the very end of cooking. Like other basils, it needs warm soil, full sun, and frequent pinching to grow into a productive, bushy plant rather than a tall stalk that flowers early.
Quick How-to
Start Thai Basil indoors about 4 to 6 weeks before your last expected spring frost, or direct sow outdoors once nights are consistently above about 50 F and the soil has warmed. Sow seed shallowly, barely covered up to about 1/4 inch deep, and keep the mix evenly moist at roughly 70 to 80 F. Expect sprouts in about 5 to 10 days under warm conditions. Thin or transplant to 8 to 12 inches apart in full sun. Begin pinching the growing tip once plants have several true leaf pairs, and harvest stem tips frequently to keep growth bushy and delay flowering.
Quick Guide
| Fact | Recommendation |
|---|---|
| Best method | Start indoors and transplant, or direct sow once warm |
| Sowing depth | Barely covered up to about 1/4 inch |
| Germination temperature | About 70 to 80 F is ideal for steady emergence |
| Days to germination | About 5 to 10 days under warm, moist conditions |
| Light for germination | Cover seed lightly; strong light is needed as soon as sprouts appear |
| Spacing | Thin or transplant to about 8 to 12 inches apart |
| Sun | Full sun; some afternoon relief is fine in very hot climates |
| Water | Even moisture in well-drained soil; avoid soggy roots |
| Harvest | Often ready to begin pinching in about 60 to 75 days; verify final packet timing |
| Plant size | Commonly upright and bushy when pinched; flower spikes lengthen the plant if left uncut |
Before You Sow
Thai Basil is genuinely sensitive to cold. Even a single night near or below about 50 F can stall young plants for one to two weeks, and frost will kill them outright. Plan backward from the date your nights are reliably mild rather than from the calendar. In short-season areas, an indoor start gives you a sturdy transplant that can hit the ground running once warm weather settles in.
Choose a container or bed in full sun with light, well-drained soil. Heavy clay that stays cold and wet is the most common reason home-garden basil sulks in spring. If you are sowing in pots, use fresh seed-starting mix in clean cells with drainage holes, and pre-moisten the mix before sowing so tiny seed is not washed deep when you water in. Thai Basil seed is small and dark, and it forms a slight mucilaginous coating when wet, which can make it cling to fingers and tools; sow with a damp toothpick or fold the packet to drop seed evenly along a row.
Label every row and tray at planting. Thai Basil seedlings closely resemble Genovese basil and other Ocimum basilicum varieties when young; the purple stem tint and narrower leaves only become obvious after the first true leaves expand.
Indoor Starting
Sow Thai Basil seed into individual cells or a shallow tray, two to three seeds per cell, and barely cover with fine seed-starting mix. Press gently for good seed-to-soil contact, then mist or bottom-water so seed is not displaced. Aim for a mix temperature in the 70 to 80 F range; a seedling heat mat helps in cool homes. A humidity dome can speed emergence, but vent or remove it once sprouts show.
As soon as the first sprouts appear, give them strong overhead light. A south window alone is rarely enough for basil seedlings, and weak light is the single most common reason indoor basil grows tall, pale, and floppy. Run a shop light or grow light 2 to 4 inches above the seedlings for long days, and reduce extra bottom heat once germination is finished so the plants stay stocky.
When seedlings have two sets of true leaves, thin to the strongest one per cell with scissors at the soil line rather than tugging, which can disturb the roots of the keeper. Pot up if roots fill the cell before transplant weather arrives.
Hardening Off and Transplanting
Harden off seedlings over 7 to 10 days before planting out. Begin with an hour or two of sheltered shade, then gradually add direct sun, breeze, and time outdoors. Skip days when temperatures drop into the 40s F, because chilled basil seedlings often go pale, slow down, and may take weeks to resume vigorous growth.
Transplant after frost danger has clearly passed and when soil feels warm to the touch a few inches down. Set plants slightly deeper than they grew in their cells, firm the soil gently, and water in. Space 8 to 12 inches apart so plants can fill out without crowding. Tighter spacing produces taller, narrower plants that flower earlier; wider spacing produces bushier plants that hold leaf production longer.
Direct Sowing
Direct sowing works well in long, warm seasons. Wait until nights are consistently mild and the soil is reliably warm; sowing into cool spring soil is the most common reason direct-sown basil germinates poorly. Smooth the seedbed, sow seed thinly, barely cover with fine soil, and water gently. Keep the surface evenly moist until seedlings emerge in about 5 to 10 days. Thin to 8 to 12 inches once seedlings have a true leaf pair.
Soil, Sun, and Water
Thai Basil grows best in full sun, with at least 6 hours of direct light and ideally more. In very hot, dry climates, a little afternoon shade can reduce wilting and slow flowering, but deep shade leads to lanky, low-flavor plants.
Soil should be fertile but well-drained. Work in finished compost before planting if your bed is lean. Avoid heavy nitrogen pushes after transplanting; very lush leaves can be milder in flavor and more prone to disease pressure.
Water at the soil level when possible. Aim for even moisture, like a wrung-out sponge in the root zone, rather than cycling between bone dry and saturated. Mulching with a thin layer of straw or shredded leaves once the soil warms helps stabilize moisture and reduces splashing onto the lower leaves.
Pinching and Pruning for Bushy Plants
Pinching is what separates a productive Thai Basil plant from a single-stalk plant that bolts to flower early. Once a young plant has three or four sets of true leaves, pinch the very top growing tip just above a leaf pair. The plant responds by pushing out two new shoots from that pair, doubling the number of growing tips.
Repeat this every couple of weeks during the season, taking small stem-tip harvests rather than stripping individual leaves. Remove flower spikes as soon as you see them forming if your goal is leaf production; once a stem flowers, that stem slows new leaf output. If you want flowers for pollinators or seed saving, let a few selected stems bloom later in the season while keeping the rest pinched.
Top Mistakes
- Setting plants out too early. Cold soil and chilly nights cause slow, pale growth that can take weeks to recover. Wait for mild nights and warm soil, even if the calendar says it should be planting time.
- Underlighting indoor seedlings. Tomato-style stretch happens to basil too. Strong overhead light from emergence onward keeps plants stocky.
- Skipping the first pinch. Unpinched Thai Basil grows tall and flowers earlier, which sharply reduces leaf harvest.
- Stripping individual leaves instead of cutting stem tips. Leaf-by-leaf harvest removes the plant’s working solar panels and discourages branching. Cutting whole stem tips above a leaf pair produces more new growth.
- Overwatering heavy soil. Thai Basil wants steady moisture, not a constantly wet root zone. Soggy soil invites damping-off in seedlings and root issues in mature plants.
- Letting flower spikes mature unintentionally. Once a stem sets a flower head, leaf production on that stem slows. Pinch spikes early in the season for sustained harvest.
Troubleshooting by Symptom
| Symptom | Likely causes | What to do next |
|---|---|---|
| No sprouts after 10 to 14 days | Mix too cold, surface dried out, seed buried too deep, or saturated trays | Warm the mix into the 70 to 80 F range, keep the surface evenly moist, and resow shallowly if needed |
| Seedlings collapse at the soil line | Damping-off from soggy mix, poor airflow, or reused contaminated soil | Use fresh seed-starting mix, water from below when possible, increase airflow, and avoid covering trays once sprouts emerge |
| Seedlings are tall, pale, and floppy | Light too weak, room too warm, or seedlings left crowded | Lower the grow light to within a few inches of the canopy, run longer days, thin to one plant per cell, and reduce extra bottom heat after germination |
| Leaves yellow or purplish, growth stalled outdoors | Cold stress, cold soil, or transplant shock from a missed hardening-off step | Protect plants from cool nights with row cover, water lightly, and wait for sustained warm weather before feeding |
| Plant grows tall with few side branches | Never pinched, low light, or crowded spacing | Pinch the growing tip above a leaf pair, give plants more sun, and respace if possible |
| Flower spikes appear early on most stems | Heat stress, drought stress, infrequent harvest, or older plant | Pinch every flower spike, harvest stem tips every 7 to 10 days, and keep soil moisture steady |
| Brown or black spots on leaves | Wet foliage, splashing soil, crowded plants, or persistent humidity | Water at the base, mulch to reduce splash, improve spacing for airflow, and remove badly affected leaves |
| Leaves curl, edges crisp, plant wilts in afternoon heat | Heat plus dry root zone, or roots restricted in a small pot | Mulch the bed, water deeply in the morning, and pot up container plants into a larger volume if rootbound |
| Small holes chewed in leaves | Slugs in cool damp weather, Japanese beetles or grasshoppers in heat | Inspect at dawn or dusk, hand-pick visible pests, and use physical barriers around young plants |
Harvest and Kitchen Use
Begin harvesting once a plant has several pairs of mature leaves and is actively branching. Cut whole stem tips with scissors or pinch with your fingernails, taking the top 2 to 4 inches and leaving at least one or two leaf pairs below the cut. Those lower nodes will branch into the next round of growth.
Harvest in the morning after dew has dried but before the heat of the day, when leaves are most fragrant and least wilted. For cooking, Thai Basil is typically added at the end of the dish so the volatile anise-clove notes are not driven off by long cooking. Whole sprigs hold up well in soups, stir-fries, and curries; individual leaves are excellent in fresh rolls, salads, and as a garnish.
For short-term storage, treat cut stems like a small bouquet on the counter in a glass of water, loosely covered, rather than refrigerating, because basil leaves often blacken below about 40 F. For longer storage, blend leaves with a little oil and freeze in small portions; the flavor holds better this way than from drying, which can mute the anise character.
Seed Saving
Thai Basil belongs to Ocimum basilicum, which crosses readily with other basil varieties of the same species growing nearby. If you want seed that comes true to type, separate Thai Basil from other basils during flowering, or grow only one basil variety per season for saved seed. Bees are active visitors to basil flowers and move pollen quickly between plants.
Let selected, healthy plants flower fully. The small flowers develop into seed-bearing calyxes that turn brown and dry on the stem. Strip the dry spikes into a bowl, rub gently to release the seed, and winnow off the chaff. Dry seed thoroughly on a plate or paper towel out of direct sun for several days, then store in a labeled, sealed container with the variety name and year.
Seed Viability and Storage
A conservative planning range for basil seed is about 3 to 5 years when stored cool, dry, dark, and sealed. Heat and humidity shorten that span, so avoid garages, sheds, hot closets, and sunny windowsills. If seed is older or has been stored in uncertain conditions, run a small germination test by placing 10 seeds on a damp paper towel inside a sealed container at room temperature for a week, then count sprouts before relying on the packet for a main planting.
Container and Small-Space Notes
Thai Basil is an excellent container herb. A pot at least 8 to 10 inches across and equally deep, with drainage holes and a light potting mix, supports a single well-pinched plant for the season. Keep the pot in full sun, water when the top inch of mix begins to dry, and feed lightly every few weeks with a balanced liquid fertilizer if growth slows. Container plants dry out faster than in-ground plants in summer, so check moisture daily during heat waves. A pot kept near the kitchen door encourages the frequent harvest that keeps the plant bushy.
FAQ
How is Thai Basil different from sweet or Genovese basil?
The cultivation is similar: warmth, sun, steady moisture, and frequent pinching. The differences are in flavor and habit. Thai Basil has narrower leaves, often purple-tinted stems and flower spikes, and a sweet anise-clove fragrance instead of the rounder clove-pepper notes of sweet basil. It also tends to hold its character better in cooked dishes and in hot weather.
Can Thai Basil grow indoors year-round?
It can, but it needs strong light. A bright south-facing window alone is usually not enough through winter; a small grow light run for long days produces much better results. Keep indoor plants out of cold drafts, water carefully, and pinch regularly.
Should I let Thai Basil flower?
For maximum leaf harvest, pinch flower spikes as soon as they appear. The signature purple flower stalks are attractive to bees and other pollinators, so many gardeners pinch most plants for leaves and allow one or two plants to flower late in the season for pollinator support or seed saving.
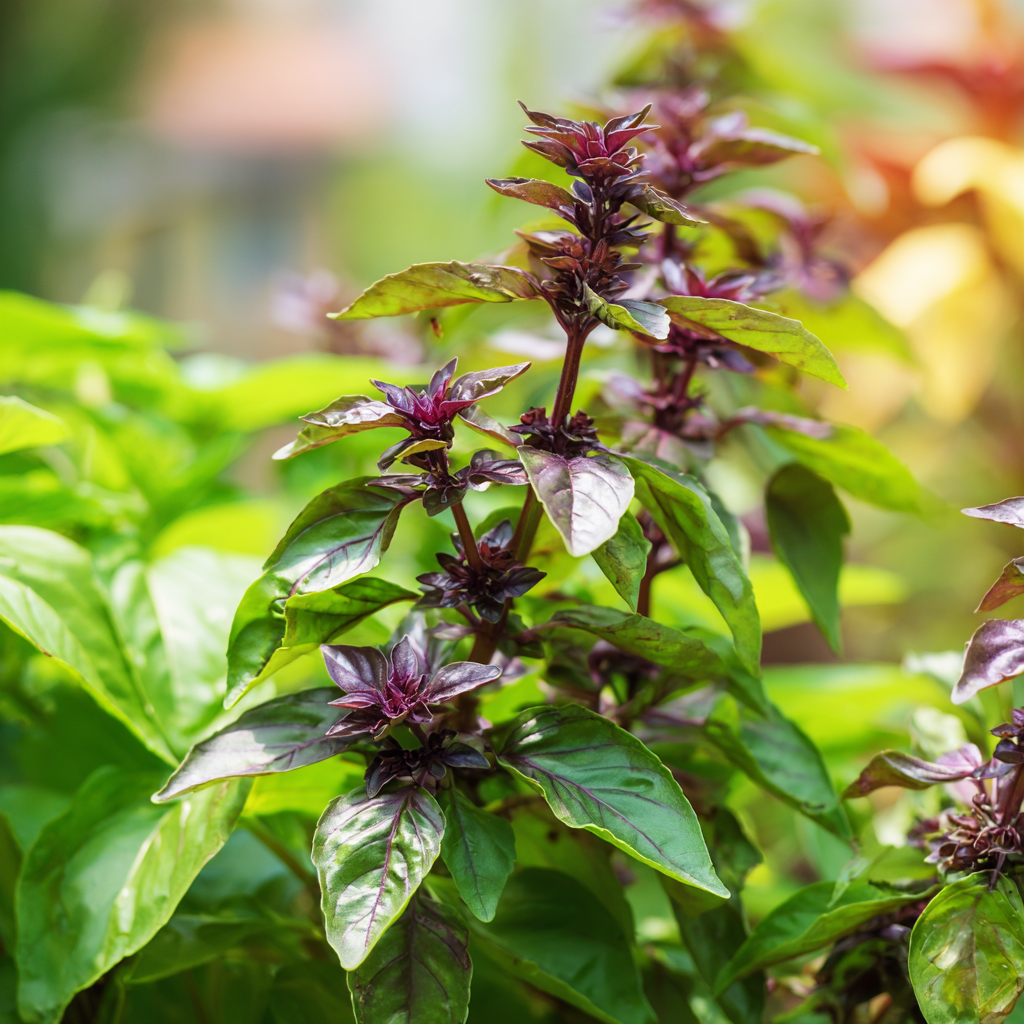
Is it normal for Thai Basil stems to be purple?
Yes. A purple to dark-purple stem tint is characteristic of Thai Basil, and the flower spikes often emerge a deeper purple as well. It does not indicate stress.